Non-Tube Clocks: LED and other random clocks
- Details
EleksTube IPS clock
A review by Paul Andrews
Every once in a while, something comes along that seems so obvious that you don’t understand why you didn’t think of it yourself. I think the EleksTube IPS clock is one of those things. It is an elegant solution to how to make a retro-style clock, using what are now ubiquitous items. In this case six small LCD (or OLED?) screens and a powerful controller – the ESP32.
Unboxing
I have been pleasantly surprised with the packaging of the two ‘nixie’ clocks I have received from China. This one comes in a nice black box, with the various parts neatly packaged in purpose-cut foam:
Removing the clock and the first layer of foam reveals the other components – the power supply, the USB cable, and the small displays themselves, safely packaged in electrostatic bags. There is also a hex key provided – I couldn’t figure out why. The very brief instructions didn’t indicate what it might be used for, but this became apparent later on:
The displays are nicely made – mounted on PCBs with an edge-connector and a side-lit neopixel:
Everything is easy to put together – the display modules fit snugly into the sockets on the PCB and the glass tubes just drop over the displays.
The power supply looks to be good quality – it is an LG travel adapter. Even the USB lead is attractive, though a little short:
The underside of the case is also decorated – with a Stein’s Gate divergence number in the style of the anime:
First Impressions
It would be one thing having the idea, but that idea is well with this clock. I like the decision to make the electronics visible, and I like the use of copper masking and ENIG plating to provide decoration of the PCB – the gold and black together look very classy.
The case has a solid feel to it, and the screens fit very snuggly into their sockets, while the glass tubes also fit with a fairly tight tolerance.
The clock comes alive as soon as it is connected to power using the provided USB power adapter and cable – though the socket on the clock is USB-C, the USB adapter is USB-A. A regular USB-C power adapter and cable don’t work – the adapter doesn’t recognize the clock – so you have to use a USB-A to USB-C cable like the one provided. This clock uses very little power, the adapter is just 0.2A at 5V, so any source of USB power would be enough.
The time is maintained using a battery-backed RTC chip – the DS3231, so it will maintain the time even if power is lost. This is an extremely accurate, temperature compensated chip, and I’m glad to see they used this and not the DS1307.
The default characters are what I assume to be renders of an ideal nixie tube, and they look very nice. The digit height seems to be comparable with IN-14 nixie tubes, so around 18mm. The displays themselves are around 25mm high.
It was an unusual choice to put the USB-C connector on the end of the enclosure, and as I was looking at the PCB I noticed that there appeared to be connectors on both sides, so now I understood what the hex key was for – you can swap the two end caps so you can plug the lead into the other side if that better suits your arrangement. A nice touch and another indication of the thought that has gone into this.
Here’s the second clock face:
And the default DIY clock face:
Controls
There are four buttons at the back of the enclosure mounted on the top. They are:
-
Left
-
Select
-
Right
-
Power
I won’t go into details about how to use them – the clock comes with an instruction sheet that explains that. The designers have used the displays to good advantage in implementing the menu system, so you could almost forego the instructions, and at least there is some chance that I will be able to drive this after a few months, unlike most Nixie clocks that require you to memorize a labyrinthine menu structure – with each clock being different than the next. Yes I dislike push button interfaces generally, but as I say, having display screens available does make it a lot easier.
Modifying the Clock Images
This was one of the big draws for me. The promotional video makes it pretty clear that you can modify the clock images. To do this you need to connect the clock to a PC running Windows 10. First download the software from here – it is all in Chinese
-
First you need to install the device driver, which is named CH340驱动.exe. I had to remove the Chinese characters to get this to run and I had also had to rename the parent folder to just use characters from the Roman alphabet.
-
Now you can plug the clock in.
-
Then you can run the uploader application called 图库上传工具.exe. You can rename it if you want, but you don’t need to. Make sure you select the correct serial port from the drop down.
-
Select the image you want to use, hit the middle button and wait for the clock to reboot. Your uploaded image will be in the third slot called DIY. These are the buttons, from left to right they say: ‘Compile a custom image’, ‘Upload IMG’, and ‘The currently selected style is:’
Here is one I uploaded:
The uploader application has 23 different built-in clock faces that you can upload, but you can also provide your own. If you look in the img subfolder you will see 12 BMP files. They 24 bit images of 135x240 pixels (this is 16:9 ratio). Replace them with any images you like of the same size and format and you can use these in the DIY slot:
-
Hit the left-most button and wait for the progress bar to display this image – it literally says ‘Gallery image compilation is complete, please click upload image’
-
So hit the upload image button (the middle one) and wait for the clock to reboot.
Final Thoughts
Overall, I really like this clock. It is a great idea, very well executed. The packaging, the enclosure, and the clock faces that are included all speak to a well thought out product that is a nice addition to my collection.
I especially like that it is configurable, even allowing you to upload your own images, and I am very pleased it uses the DS3231 to maintain accurate time.
I have only a few minor issues:
-
They could have made their USB-C connectors play nice with USB3.0 power supplies and still work with USB-2 power supplies.
-
It uses an ESP32, but there is no indication that it uses either WiFi or BlueTooth. Hopefully they will in a future firmware update.
-
It would be nice to be able to upload more clock faces at the same time.
Promotional Videos
"A picture says a thousand words" and a video says ten times more than that. Here are some videos from the the makers of the EleksTube IPS.
You might want to turn down the volume before clicking on these - the soundtrack is quite loud:
Operation of the clock
Another demonstration:
Links
- Buy from Aliexpress
- Details
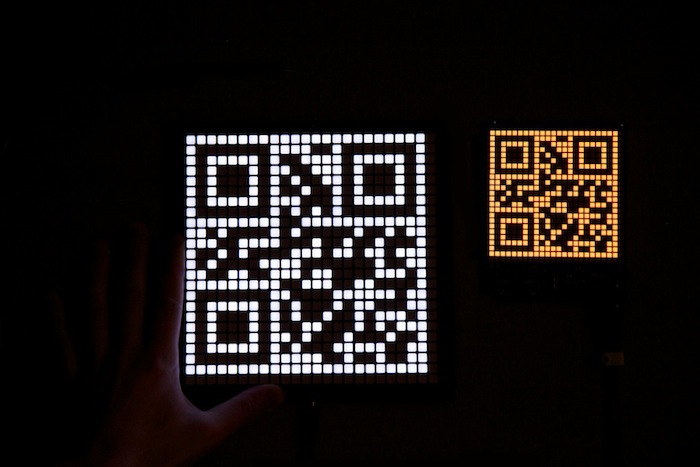
Here is an announcement that I'm very excited about. The QR Clock from http://ch00ftech.com/ that was on Hack A Day a few weeks ago has been refined an now available for pre-sale on Tindie. If you haven't seen this device - it is a large LED matrix that generated QR codes that contain the time. Of course, you have to pull our your smart phone (which has a built in clock) to read this device diminishing its utility somewhat. This interesting juxtaposition is what makes this clock genius in my opinion.
As of this writing, the campaign has reached $1,800 of its $5,000 goal. The clock itself is only $100 so if you're interested, please pre-order it before the campaign ends.
From the description:
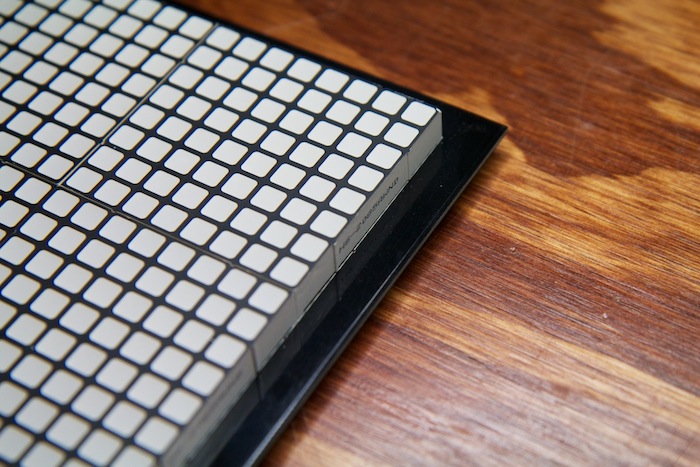
The time is displayed as a Version 1 21x21 pixel QR code. Try to scan one of the images on this page for a quick demonstration. It measures 8x8" and features a brilliant white display that automatically adjusts to ambient lighting allowing it to be clearly visible during the day without being distracting at night. It has a simple mounting system on the back that will work perfectly on a standard picture hanging nail. The soft rubber pads under the display will keep it from damaging the wall.
Links:
- Details
Jurgen just sent me a video of his latest creation - a neon bar graph audio VU meter. This device is powered from a 12V DC wall power adapter or from 2x USB ports because of the 1A current draw. It uses a logarithmic display from -20 dB to +10 dB. The enclosure will look like the NixieTherm or the headphone amp that is currently in production.
Links
- Details
Paraphrased from the seller: This is a hand crafted, radio controlled clock. Each clock is one of a kind and only the highest quality components are used. The buyer may customize the clock with any LED color or size of their choice.
Link:
- Vimeo video: http://vimeo.com/32168012
- Youtube video: https://youtu.be/MKJBR_ZyRWg
Search